Class Meeting Lesson - Identity- December 4, 2018
Materials Needed:
iPads - Safari
Teacher Laptop and Projector
Drawing Paper
Writing Implement of Student Choice
Looking up historical figures on the Visual Thesaurus:
https://www.visualthesaurus.com
https://www.visualthesaurus.com
The search box at the top of the page will allow you to type in someone’s name and follow the directions below.
Introducing the concept of an identity map:
Materials Needed:
iPads - Safari
Teacher Laptop and Projector
Drawing Paper
Writing Implement of Student Choice
Looking up historical figures on the Visual Thesaurus:
https://www.visualthesaurus.com
https://www.visualthesaurus.com
The search box at the top of the page will allow you to type in someone’s name and follow the directions below.
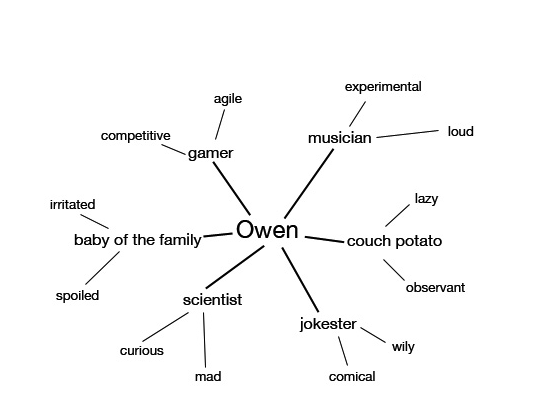
- Start this lesson by looking up a historical figure's name in the Visual Thesaurus, and displaying the map associated with that name on the classroom whiteboard. (For example, you could look up Benjamin Franklin, Harriet Beecher Stowe, or even Charlie Chaplin.)
- Once you display the historical figure's description by scrolling the cursor over the red bubble associated with the person's name, click on that red bubble to reconfigure the map to show different nouns that are used to describe that person's roles. For example, by clicking on Benjamin Franklin's description, students will see that Franklin was known as an "American Revolutionary leader," a "writer," a "printer," and a "scientist."
Introducing the concept of an identity map:
- Explain to students that today they will be mapping their own identities, in a similar fashion to the people and word maps they have seen on the Visual Thesaurus. Although they may not be well known or famous for their different roles, they will use this mapping opportunity to introduce themselves to their peers through their identity maps.
- Encourage students to consider all the roles they may identify with in the different facets of their lives. They can think of their familial roles (Big brother? Big sister? Baby of the family?); their roles in school (Writer? Reader? Scientist? Historian? Artist? Class clown?); their roles outside of school--on the playground, on the Internet, or among friends (Hoopster? Gamer? Confidant?); or any other roles that may come to mind
- Distribute a sheet of drawing paper to each student.
- Instruct each student to use a marker, colored pencil, pen, or regular pencil to write his or her name in the center of the drawing paper with large bold letters.
- Direct students to draw a different line or ray on their identity maps for each role they wish to include. At the end of each line, they should write the word that identifies that particular role. Students should include at least three or four of these lines.
Sharing:
- Have students share the maps in small groups or in a "gallery walk" format (where students post the identity maps on the classroom's walls and students circulate around the room reading the maps and leaving feedback on sticky notes).
- After sharing their identity maps, students could discuss their observations. What did they learn about their peers through this mapping exercise? What roles do many students share? What adjectives were the most descriptive or unique?
 RSS Feed